malarkey!

A few weeks back I was browsing the reuse center when I spotted— gasp! Lumber! I’ve seen a lot of odd building supplies there but actually never just stacked wood. I kinda chuckled to myself as I made a beeline for the pile, wood has become such a meme since prices have like tripled over the course of the pandemic. But my amusement quickly cleared when I recognized what kind of wood this was…


I picked up a couple boards off the top and found them a little light for 3/4”, as if too weathered, or maybe dry rotted? Only a couple boards down I found a stamp: M&M Malarkey redwood siding, from about the 1940s or 50s when the Oregon and California logging industries were in their heydey.

I was suddenly a lot more hopeful. Redwood has a great reputation for its preservative resins and I felt even the most severe weathering would only intrude 1/4” or so into the core on the painted side. At the edges the tongue and groove fittings were damaged when the siding was removed by crowbar. This kind of wood will need a planing to be usable anyways, and will probably become 5/8” or 1/2” thick before new boards are cut from it.

I went through practically every piece and tried to pick the straightest, least weathered candidates with the prettiest grain. There were some with blonde streaks scattered in the piles. It took a while to get through it, but when I did I had about 20 long boards and 5 short which I got for $45! Over the next week, I would find myself daydreaming of what I might use the boards for, and sometimes I’d think “but did I get enough for that?”. By the end of the week the thought was accompanied by a vague sense of dread— I should have gotten more!

I felt good about not just clearing out the cache though. In the meantime, I thought, if someone got the rest that would be fine. I hadn’t done so intentionally but I stood by my grace period— when I got back to the pile a couple days ago I’d say about 1/4 more had been taken, probably in portions of one or two boards. I felt okay about giving the remains the same treatment as I had earlier, picking through methodically and selecting only the best. The second time I got 15 long and 15 short and paid about $45 again.

I planed a few down on both sides, to a half inch thickness, to see what the grain really looked like and was stunned! It’s hard to get the pictures to do it justice, but it’s such a sparkly, iridescent wood. I *cannot wait* to see what it looks like oiled and sealed!


1955 wall finishes catalog — source

1955 wall finishes catalog — source

I wasn’t aware of the Malarkey brand before finding this siding but the stamp sparked its own little interest. I did a little googling but couldn’t turn up much information on the stuff. Some ads from after the company went public and eventually an obituary of the founder were all I managed to find.

James A. Malarkey’s M&M mill opened in 1918 when he bought a shipyard millwork company in Portland, Oregon, which made deck plugs, belaying pins, pulleys and mast hoops— details of the wooden age of sail. Following World War 1 the industry declined, and M&M began producing folding ironing boards just as electric irons became commonplace. They became one of their biggest manufacturers and quickly grew in size.

The automobile industry was taking off at the same time and brought a new demand for garages. The cars bodies of that era were made of wood panels that could not withstand much weathering. Malarkey began to manufacture garage doors, and then doors of all kinds. During this time The company began experimenting with laminated wood, which led to them building a plywood mill in Longview Washington.

Over the course of the 1930s the company bought and updated a series of mills in the PNW dedicated to plywood manufacture. The M&M production volume was then nearly 70 million board feet, about 10% of the total fir plywood industry when they began taking government contracts for marine and aviation plywood during World War 2.

In the postwar boom M&M bought one billion acres of standing timber (forest) in the redwood country of Northern California and continued consolidating area mills. Just two days after the company went public in 1948, James Malarkey died age 76. The company was sold in 1955 for a little over $50 million (roughly half a billion dollars adjusted for inflation). I think this final decade of the Malarkey brand is when my boards originated.

The World’s Largest Hollow Log — source

The World’s Largest Hollow Log — source

It’s hard to come across much information on what happened to the Malarkey timber lands after the company was sold. Rare bits turned up around the “last Malarkey giant”- the World’s Largest Hollow Log since 1987, which was apparently felled on land once owned by Malarkey a few miles north of Crescent City, California. The sheer scale of the trees that Malarkey redwood was cut from becomes apparent under the title “worlds largest”. In fact that superlative pertains just to the hollow part, and these Sequoia Sempervirens grew even larger. They can live over 2000 years and reach heights of 300-350 feet, and are only found along a 450-mile strip of the Pacific Coast of North America. I try to keep this in mind as I refinish my planks, which were part of someones house or shed too. They were likely milled from trees that predate much of my ancestry, before being worn by the weather of my region for half a century. Wood is so fascinating.


at the seams

The day after sewing my sling bag all I wanted to do was keep making bags! But I didn’t have another pattern. I thought of maybe just going for a more perfect draft, but the idea of doing it in the same colors didn’t really appeal. The piping and the sport zipper made me want to make a small backpack.

I have two bags that I really like— a convertible leather sling bag given to me by a dear friend and a thrifted daypack from the 70’s made of cordura and suede. Neither is quite a backpack, but the way they sit very centrally on my back and close to my body makes a secure place for a camera or water bottle along with my phone, keys, wallet and maybe a journal or book. They carry a couple generous pockets full of things rather than a genuine haul but being forced to moderate is helpful to me.

Maybe it has to do with their size or else that they’ve come around with me to all sorts of places, but I cherish these two. The leather one is a lot like a purse, especially when the straps are zipped together and I love its heavy clasp and hidden liner pockets. The tan daypack is just so structural when its empty, its like truly a *bag* and nothing more.

 
img002.jpg

I drew a design sort of fusing the two bags in different ways, at least that was my intent. It took a bit of its own direction but I tried to base the size and general design on the sling bag while carrying over material and construction details from the daypack. The front and back of the outer shell each wrap at the edges to form an inner face that joins with the zipper. To connect the straps with the main load I added a rain hood that attaches to a strap on the front of the bag.

I started using some bulk drawing paper to sort of wrap the leather bag on as close to its face as I could manage to define. The overall shape of the outer pieces was a little overwhelming to begin with, so I started with the far simpler main inner-lining. Once I made that basic four-piece pillow, I could take it apart and offset some lines for a starting point on the outer layers, to work out their exact shape and outlines when laid flat.


I was pretty sure that I understood the key moments in the assembly, but I was seriously puzzled by how to like, turn it the right way inside-out for the right sequence of seams. I couldn’t mentally walk through it completely, or I found it difficult to trust my impression of the process. I needed to mock up the basic seams in a really quick and easy way, so I took apart my paper model and traced down the shapes onto some felt.

From there seaming together the shape of the bag was pretty easy, but I didn’t actually stitch any of it. I used spring clips to hold it together giving me a rough idea of the assembled bag. Using leftover felt for the model is fine but hardly gives an idea of how the bag would behave when empty or full. It has entirely different structural qualities to canvas or cordura and suede, with chunky assembled seams and zippers. I was able to get more of the design assembled using the felt, even if it only showed me a rough impression.

I learned a lot more about my design before committing to final notions and materials though ($!). The model showed me that the folding design of the leather sling bag doesn’t translate very well to felt, and probably even worse to woven materials. It depends on a crease that remains deep and structural whether the bag is empty or full. Its easy with leather but with fabric it would make more sense as a seam than a crease.

I’ll probably end up making a few more of these drafts to answer whether the purse-like opening can be made using seams or piping instead of creases, and to place the straps in the seam at the top of the bag. I’ve been sketching a version with pockets that I want to make a draft of along the lines of this one.

mechanatrix pt.2

Untitled-1.jpg
IMG-6388.jpg

I had been tinkering with my first sewing machine through the fall, all the while sourcing bits and pieces through ebay, and I had begun to wander the marketplace. Anything can be sent in a big enough package but sewing machines are some of the only industrial machinery sized just right to be sent through the mail in genuine parcels.

I came across good things about the Pfaff 130 on a few vintage sewing forums— I think I read that they were popular on working ships because of their small size and ability to sew through multiple layers of sailcloth… They’re usually brought up when someone wants to make jeans. I had also read that when they were first introduced they were sold on a kick treadle, so in theory one could be mounted in a table with an industrial motor.

There were a lot made, so they aren’t very rare or expensive. They were introduced in Germany in the 1930s, 25 years before being imported to America virtually unchanged and avoided my prejudice against modern consumptive rot. In a lot of ways the 130 is like a miniature of the truly industrial Pfaff 138 which is itself an interesting industrial hybrid; producing both straight and zig zag stitches in a so-called ‘artisan’ format.

I got a smaller 130-6 for a pretty good price at auction hoping to adapt it to a light-industrial/mini-artisan arrangement. It showed up right when I was in the middle of making some silly mistakes on the table that I had intended to have ready in time for its arrival. It was ready to use though, in a wooden tray with a small portable motor attached, stock as it would have been sold in the 50s.

In this ‘electrified’ state the controls are a little jumpy from the tiny low-torque motor pulley, but more noticeable is the artificial limit on its power. You feel the difference in a lot of different ways when the motor power is more proportionate to the abilities of the mechanism— that famed denim & sailcloth muscle. I replaced the plastic portable-style hand wheel with a heavier cast iron piece I sourced using the standard axle bore for this kind of machine. I also had to replace a few specific parts of the thread tension assembly that had rusted and were snagging.

With the larger motor & heavier inertia the needle just glides through everything effortlessly! The higher torque of the industrial motor actually makes it easier to go slow. All I could ask for is a walking-style foot (as on the 138) to help translate all that power into traction, as the mere ability to puncture many layers of canvas, denim, or sailcloth doesn’t necessarily translate to very graceful feeding of the material. There are times when you have to help the material along through a curve but the action of the machine never struggles. Its a steady machine nevertheless, capable of zig-zag & straight stitch (there’s also a sorta rare embroidery stitch module that attaches to the back of the machine).

I started humbly, with a single layer of canvas and some bias binding, practicing reinforcing the edges of the canvas that were prone to fraying. I picked up the technique quickly enough but learned that the actual shape of the cut piece is a consideration too. Certain angles left both the long and cross grain frayed and weak, meaning the stitches and binding kept pulling apart. I solved this by using thicker bias tape and stitching as close to the inside edge as possible— it worked, and I used that approach on the rest of the tool roll that I ended up making.

It turned out to be a really good little study of a lot of the different stitch conditions I would need to learn— lots of parallel lines with a variety of spacing, all the way down to double line topstitching, curves throughout and extensive practice with binding... Its a super messy piece but its still finished well enough that I’ve used it to store my wrench set for a couple months without so much as a loose thread.

The tool roll helped me get started on a more complex project, this sling bag design. I had some yellow and natural duck canvas from a long time ago when I had stretched some of it for paintings. Another quick voyage around the various thrift stores around here and I found some tan piping!

As simple as it may sound just making a basic tool roll, flaws and all, maybe helped me more than all of my meticulous study of the different methods. After handling and arranging the fabric and getting to know how seams can be used in different ways, I could just see the steps in my mind much more plainly when I approached the cut pieces of the pattern. Any amount of time you spend warming up on a machine & getting to know its quirks on a particular kind of material pays off immediately, as well.

I managed to get pretty clean seams throughout the sling bag, with a few sloppy (yet sound) portions on the interior bindings. Those parts were stitched through 5-6 layers, without too much trouble, but sometimes I had to advance the work piece myself... I could get a cleaner result on multiples, given more practice with each of the conditions.

I had to sew the topstitching connecting the front pocket a couple times, taking care to equally place each of the corners to be level and to avoid an overlap at the end. I was just practicing and didn’t take a lot of time sourcing notions but I do wish I had just gotten my zippers before starting! I began with the smaller pocket since I already had a 7” zip but I couldn’t find a match for it for the longer 14” when I got back to the store— not a major regret.

I use the bag a lot, the placement of the sling is really nice and I find myself reassured by the way it hugs my side :)

woodsmithing

Screenshot 2021-04-12 200242.jpg


By the time it had gotten cold out, I knew my interest in sewing went beyond my little necchi. I still wasn’t sure exactly which heavier duty machine I was most interested in, but I was learning more about them. Industrial machines are actually just stitch and feed mechanisms, lacking a motor. These are called machine “heads”. They’re driven by a universal 3/8” belt that runs from the motor pulley to a channel on the heads’ hand wheel. Typically heads are only interchangeable on the same table if they use the same bed dimensions, like if they share a common predecessor. I wanted to make a plug-in style workstation that could run a couple different uniquely sized sub industrial machines I had been looking at.

Why ‘sub’ industrial? Well~ good question. the category doesn’t really exist, but to my mind it describes a type. There are exceptions but typically an industrial machine isn’t meant to be casually taken in and out. They’re pretty much built into their workstation on a permanent basis. There’s usually a good reason— the Adler upholstery machine I’ve eventually come to own weighs nearly 80 pounds! To plug that kind of machine in temporarily would require an overhead hoist— a nice daydream anyways.

Sub- industrials on the other hand, top out at… lets say 50 lbs I guess? (there is not a firm number). But in general they’re more a result of bygone regimes of mechanical quality, “overbuiltness” and other kinds of consumer materialism like home industry. For my purposes, they’re smaller than *the average* industrial and are light enough that they can be moved and stored in standardized crates without a lot of fuss or lifting equipment. They’re often antique. Sometimes they’re deeply industrial and simply very small, like the incredibly dense Merrow sergers. So this table was meant to be a hybrid strong enough to hold a true, small industrial, and also pruned back to leave space for larger, over-engineered domestics.

The inside edge of the opening on the tabletop has two ledges on its profile to support a tray insert. Pretty much anything that can be mounted within the perimeter of the tray can be aligned to the motor pulley below and then as a unit is easily taken in and out. The trays themself form a sandwich with an upper and lower box as a part of a crate scheme I also designed.

I ended up taking too much time working out different designs and didn’t pay close enough attention to the changing season. It was starting to get too cold to work effectively in the shop and I had finally won an ebay auction on a machine head. Spurred by panic and frustration thinking of a winter with nothing to do I simplified my better drafts into something very executable and I set about sourcing its deliberately simple materials.


I started with 2x4s that I joined together using laps. The part that the motor attaches to is not tied into the structure, but is more like a spacer (it was also friction fit in place). I could kind of tell just by looking at it that the table was too heavy, And not wanting to lose my progress to the colder and colder days, I made a rash decision to rout the bulk of the 2x4s on their hidden faces, making sure to leave a flange at the edge for stability. The cross members that attached to the steel base were also left intact.

In my routing zeal I made a template to recess the power switch to the motor— I felt way cooler than I was qualified for until I realized I had routed the wrong side of the table! Its ok, its ok! We designers know how to rationalize: now I have a reversible tabletop… only not quite. The biggest shame of it is that the deep route of this little ad hoc nightmare happened between my main supports, right where the dead load was most likely to bear down. I was getting worried about how it would work fully loaded, while being leaned on. Take my advice traveler: just craft a design and execute it, forget this nonsense.

Feeling sobered by the limitations of freehand woodworking, or eh “going off plan”, I tried to build the intricate trays with as much scientific accuracy as I could bring to the task. I used a 1 1/8” forstner bit to drill the recesses for the hinges. I made jigs using scrap masonite for pretty much every operation, used a fine mechanical pencil for marking, planned all my brad nails, even shaved a piece of cork to act as a shim under one of the hinges etc, etc. And the results show! I somehow lucked into a zero tolerance finish on a couple of the moments in the build.

On the second of the trays I had just as much luck in cutting and machining accurately but I failed to correctly measure the margin needed for the belt to pass by the machine base. It turned out to be really narrow! So I had to shift the recess I had routed to the right by about a quarter of an inch. That would have been enough but I had already drilled my hinge recesses according to my original layout! I filled and sanded the gap, and re-drilled but it really shows. For my purposes it got me sewing on the Pfaff during the cold months so I don’t really mind, but jeez…


Like a lot of the things I made over the past year, I have fonder feelings for the things I learned about myself and the extent and limit of my abilities than I do for my specific creation. Learning about how matters of construction inform matters of design, etc. Learning the specific behavior and limit of materials at different sizes, and how different tools interact with it. Looking back on the whole year its also cool to see my tolerances get smaller and my finish quality becoming more considered. Each project has been a step.

I think it showed me more exactly the way I would truly prefer a multi-machine worktable to be, and how I might actually make that. It definitely showed me how much I would value a logical and clear space for woodworking though, as I had begun to feel some dignity in my work. Even my not-so-crafty expirimentation had yielded at least one worthy result: I rounded the front corners of the table to keep fabric from snagging. I continued to work on a couple designs through the winter and to conceptualize what a portable woodworking kit would look like for my interests. Once I get a more carefully considered production space up and running I’m looking forward to building version 2!

 
IMG_4040.gif

mechanatrix pt.1


At some point during my time gardening, I made a visit to the Reuse Center and spontaneously found this semi- functional vintage sewing machine. A Necchi Supernova (automatica) from about 1955. I didn’t really need any convincing, faced with the khaki, vespa styling of this machine. I made sure the chrome wheel operated smoothly and I hoisted the heavy tray onto my hip. I didn’t have any idea about sewing in my mind when I walked in, but I pretty much immediately grasped a sense of purpose in this beautiful durable machine. I have only ever been so gripped by the near agency of an object before in the form of a book— a particular sense that some possibility, or ability, or path is embedded in the specific tool, and a sudden onset of the feeling, as in a library or bookstore, or now reuse center, that I have to get this artifact home. It belongs in a museum!

Inspiration aside, when I got the machine home it did run but erratically, in a very sudden cycle. I could only get decent stitches in the straight stitch mode. I now know that this can be evidence of resistance in the machine which is only overcome at high motor speed, thus the 0-60 effect. To no surprise, it needed a cleaning and oiling. In the months since first learning to operate these mostly metal machines Ive gotten better at naming what charms me so in their oiling- they really are scale implementations of the same kind of mechanics of the age of steam! Lubrication is their original sin, part of virtually all machine operation…

Beneath the top panel I removed the automatic mechanism, which translates the regular radial motion of the drive axle into a ratchet-advancing drive for pattern cassettes. A system of 3 levers are pressed against the surface of an interchangeable star shaped disc (‘supernova’). The profile of each disk moves a lever, which carries that motion to the controls for the stitch length, width or advance/reverse speed controls, causing them to move “automatically”. The mechanism works vaguely like a music box cylinder, with one element “reading” the surface of a rotating disc. potentially Infinite embroidered stitches can be created by mixing and matching the discs.

With that assembly out of the way I could get some light solvents in and clear some sticky sections of the drive train. The next day I oiled and replaced all the parts and tried again…

With everything cleaned up and lubricated I was able to control the speed a lot more precisely, tested by making a pin cushion which has since (following careful de-pinning ) been given to our cats.

Something still wasn’t quite right though, and as I investigated I soon found the final source of the friction. The bobbin winder which is located on the inside of a flip-out door near the hand wheel was still engaged even when stowed away— it was acting as a little rubber brake! And when I took apart the assembly and tried to replace just the door, I found it needed the whole unit in order to stay closed at all. So i took it off altogether and suffered a gaping hole on the face of my machine while I took to a new hobby altogether: sourcing vintage stuff on ebay…

There, it’s common to find machines that have been disassembled, sold by the individual part. I found what I needed pretty quickly but my interest was piqued: a set of original attachments, including embroidery discs, and a pair of original owners manuals were soon mine.

Using the battered tray that my machine came with as reference, I designed an integrated storage container for the supernova, its attachments, and an array of sewing notions, though it was more of a modelling flex and not really something I knew how to build ... At some point I will probably build a system of crates sharing some standard dimensions for all my different machines.

I’ve had issues with the impulse rate of the embroidery mechanism, and haven’t gotten it to make reliable decorative stitches, but produces great straight and zigzag stitches. I made a small quilt with a lot of repetitive seams to get a feel for its quirks, how it likes its thread tension, how it feeds, etc.


My first impression of this machine was about what a communist feel it had to it— which in hindsight I think was just my modern puzzlement at a stylish piece of tech that is designed to be durable! It is so dissonant with the way technology is valued in our late capitalist sense of reality as to almost suggest a delirious political agency in simply its longevity. Add to that its drab chicness and khaki styling, and the fact that it is of the moment just after the second world war, before global trade had become the new world hegemony. I had a little hope that it could have been somehow influenced by world leftism, thinking of the history of cooperative manufacturing in the Mediterranean.

Unfortunately, I only credited this darling from the perspective of what our modern market for sewing machines, or technology more broadly, lacks. You just cant find many consumer oriented (and styled), full metal sewing machines anymore. The same goes for any appliance, really. Usually, as in refrigerators, and cars, there’s a very plain reason for the constant advancement, but this machine comes close to equal with its modern equivalents for features and could outlive their proper function by a power of ten.

Necchi itself began producing sewing machines in Italy based on patents owned by singer, the arch monopoly in sewing machine history. So, nothing so politically ground breaking or paradigm shifting in the roots of the organization. The Supernova was a hit at the time of its introduction because of its sleek design and its novel automatic embroidery stitch system but was also very heavily built, almost entirely of cast iron and machined alloys. Under the body lines the supernova is a lot like an improved machine of the 1920s.

There was a boom in patents for sewing machine improvements around the turn of the century, which coalesced around the time of their expiration into the modern integrated sewing machine capable of a variety stitches, many of which had been proprietary. Before, even the channel for thread tails on heavy duty needles was originally a feature unique to Pfaff needles! I’m left wondering if the supernovas unique combination of stylish and overbuilt is a result of desire and marketing having only just overtaken usefulness and longevity; whether its overbuilt qualities are vestigial and its styling natal. The Supernova’s successor, the Mirella, is featured in Moma’s permanent collection. Obviously 70 years later, consumer devices of all kinds are understood for their materiality in about as much of a way as we can understand the materiality of a jpeg; its pretty much image all the way down.

Whatever lingering hopes I had reserved for the political materiality, and the industrial-consumer end user of this machine were effectively over upon finding the original marketing materials. However as if to drive home my materialist confusion, the product delivered on even its most fantastic claim: my supernova has entered the 21st century!


a year unemployed...


This past week marked a year since I moved to Ithaca from NYC, and has left me thinking about the ways that I’ve kept myself busy. Pretty shortly after returning I was baking bread and sprouting seeds; living the newly minted quarantine tendencies. For whatever reason, when the question of where I would plant my seedlings arose, I became really intent on building a raised planter bed for them— maybe my newly invoked domestic spirit; I wanted to build my plants a home. It’s become clearer to me since then that this was a crude kind of systems thinking as a play for some feeling of control during what felt like the end times. I wanted to make a plant system.

Screenshot_2021-04-03 VegTrug Build Video Medium 1 8m.png

During the time I was researching the design, trying to suss how much weight in wet dirt it would need to hold, and how it would drain, I came across the british “Veg Trug” line of planters. They’re pretty much just what I was imagining, I could even picture them working as repeatable modules. A perfect garden system building block, but for the cost of two ($400 before shipping) I knew I could make my own.

I was almost right: I managed to get my lumber and a Bosch router for less than the cost of two new trugs but I had to renew my sketchup subscription in the midst of designing a trug built of the lumber sizing available to me. I also remember the galvanized shoes I added where the legs meet the ground being rather pricey for twelve, but by the time I had arrived at protecting the end grain I had become pretty attached to my trugs. Reverse engineering was easy, I just watched official videos instructing the user on how to assemble their flat-packed pieces.

Once I had a good enough handle on the design I bought my lumber and stacked it to dry for a week or so since it was fairly wet, I think it must have been rained on in the loading bay or something.

I laugh thinking back to then, at how slow and clumsy I had been, laying out my cut angles by carefully checking the my model for the board lengths on each side of the slope, and using a little speed framing triangle. At this time, about a year ago, I was borrowing tools from a good friend and was able to use his miter saw and drills, as well as a countersink set. I’ve come to appreciate a few very helpful tools in the time since then, which have helped me work faster and more accurately, but I knew I liked the router as soon as I used it. My first passes were thrilling but pretty rough, with a lot of gouging and streaks. The inside face of a lap joint on outdoor furniture is about as good a place as any to start practicing free hand routing I think. I began using a very simple rail, offset from my red pencil line in a very crude manner. It did give me straight although far from square edges. I don’t think I would call it a solution today, but at the time I felt pretty crafty.

The shop had been formerly well equipped but was being emptied out when I got access, so I had an abundance of scrap wood and loose c-clamps, and tables I could drill into for quickly mounting jigs, but not much organization to work with. I was working very fast and loose— it should be said that by the time I was able to use this space, the growing season had been underway for a few weeks and my seedlings had been quickly exceeding their potted halfway homes. I really wanted to get them into at least the first planter before it was stupidly late in the early season.

I stained the outside faces to match the conditions of my mothers stone patio. I just love greys of all kinds and didn’t mind the natural wood showing through a bit. That warmth intensified with the addition of a spar varnish top coat. They’ve been in the sun and snow for an entire year now and still look in pretty good cosmetic shape. The task of covering the entire set on both top and bottom with that marine seal was truly a torture on my back, but also helped me to straighten out some agonizing kinks, lol. It was memorably straining, in the future I would definitely take the time to build a raised dolly.

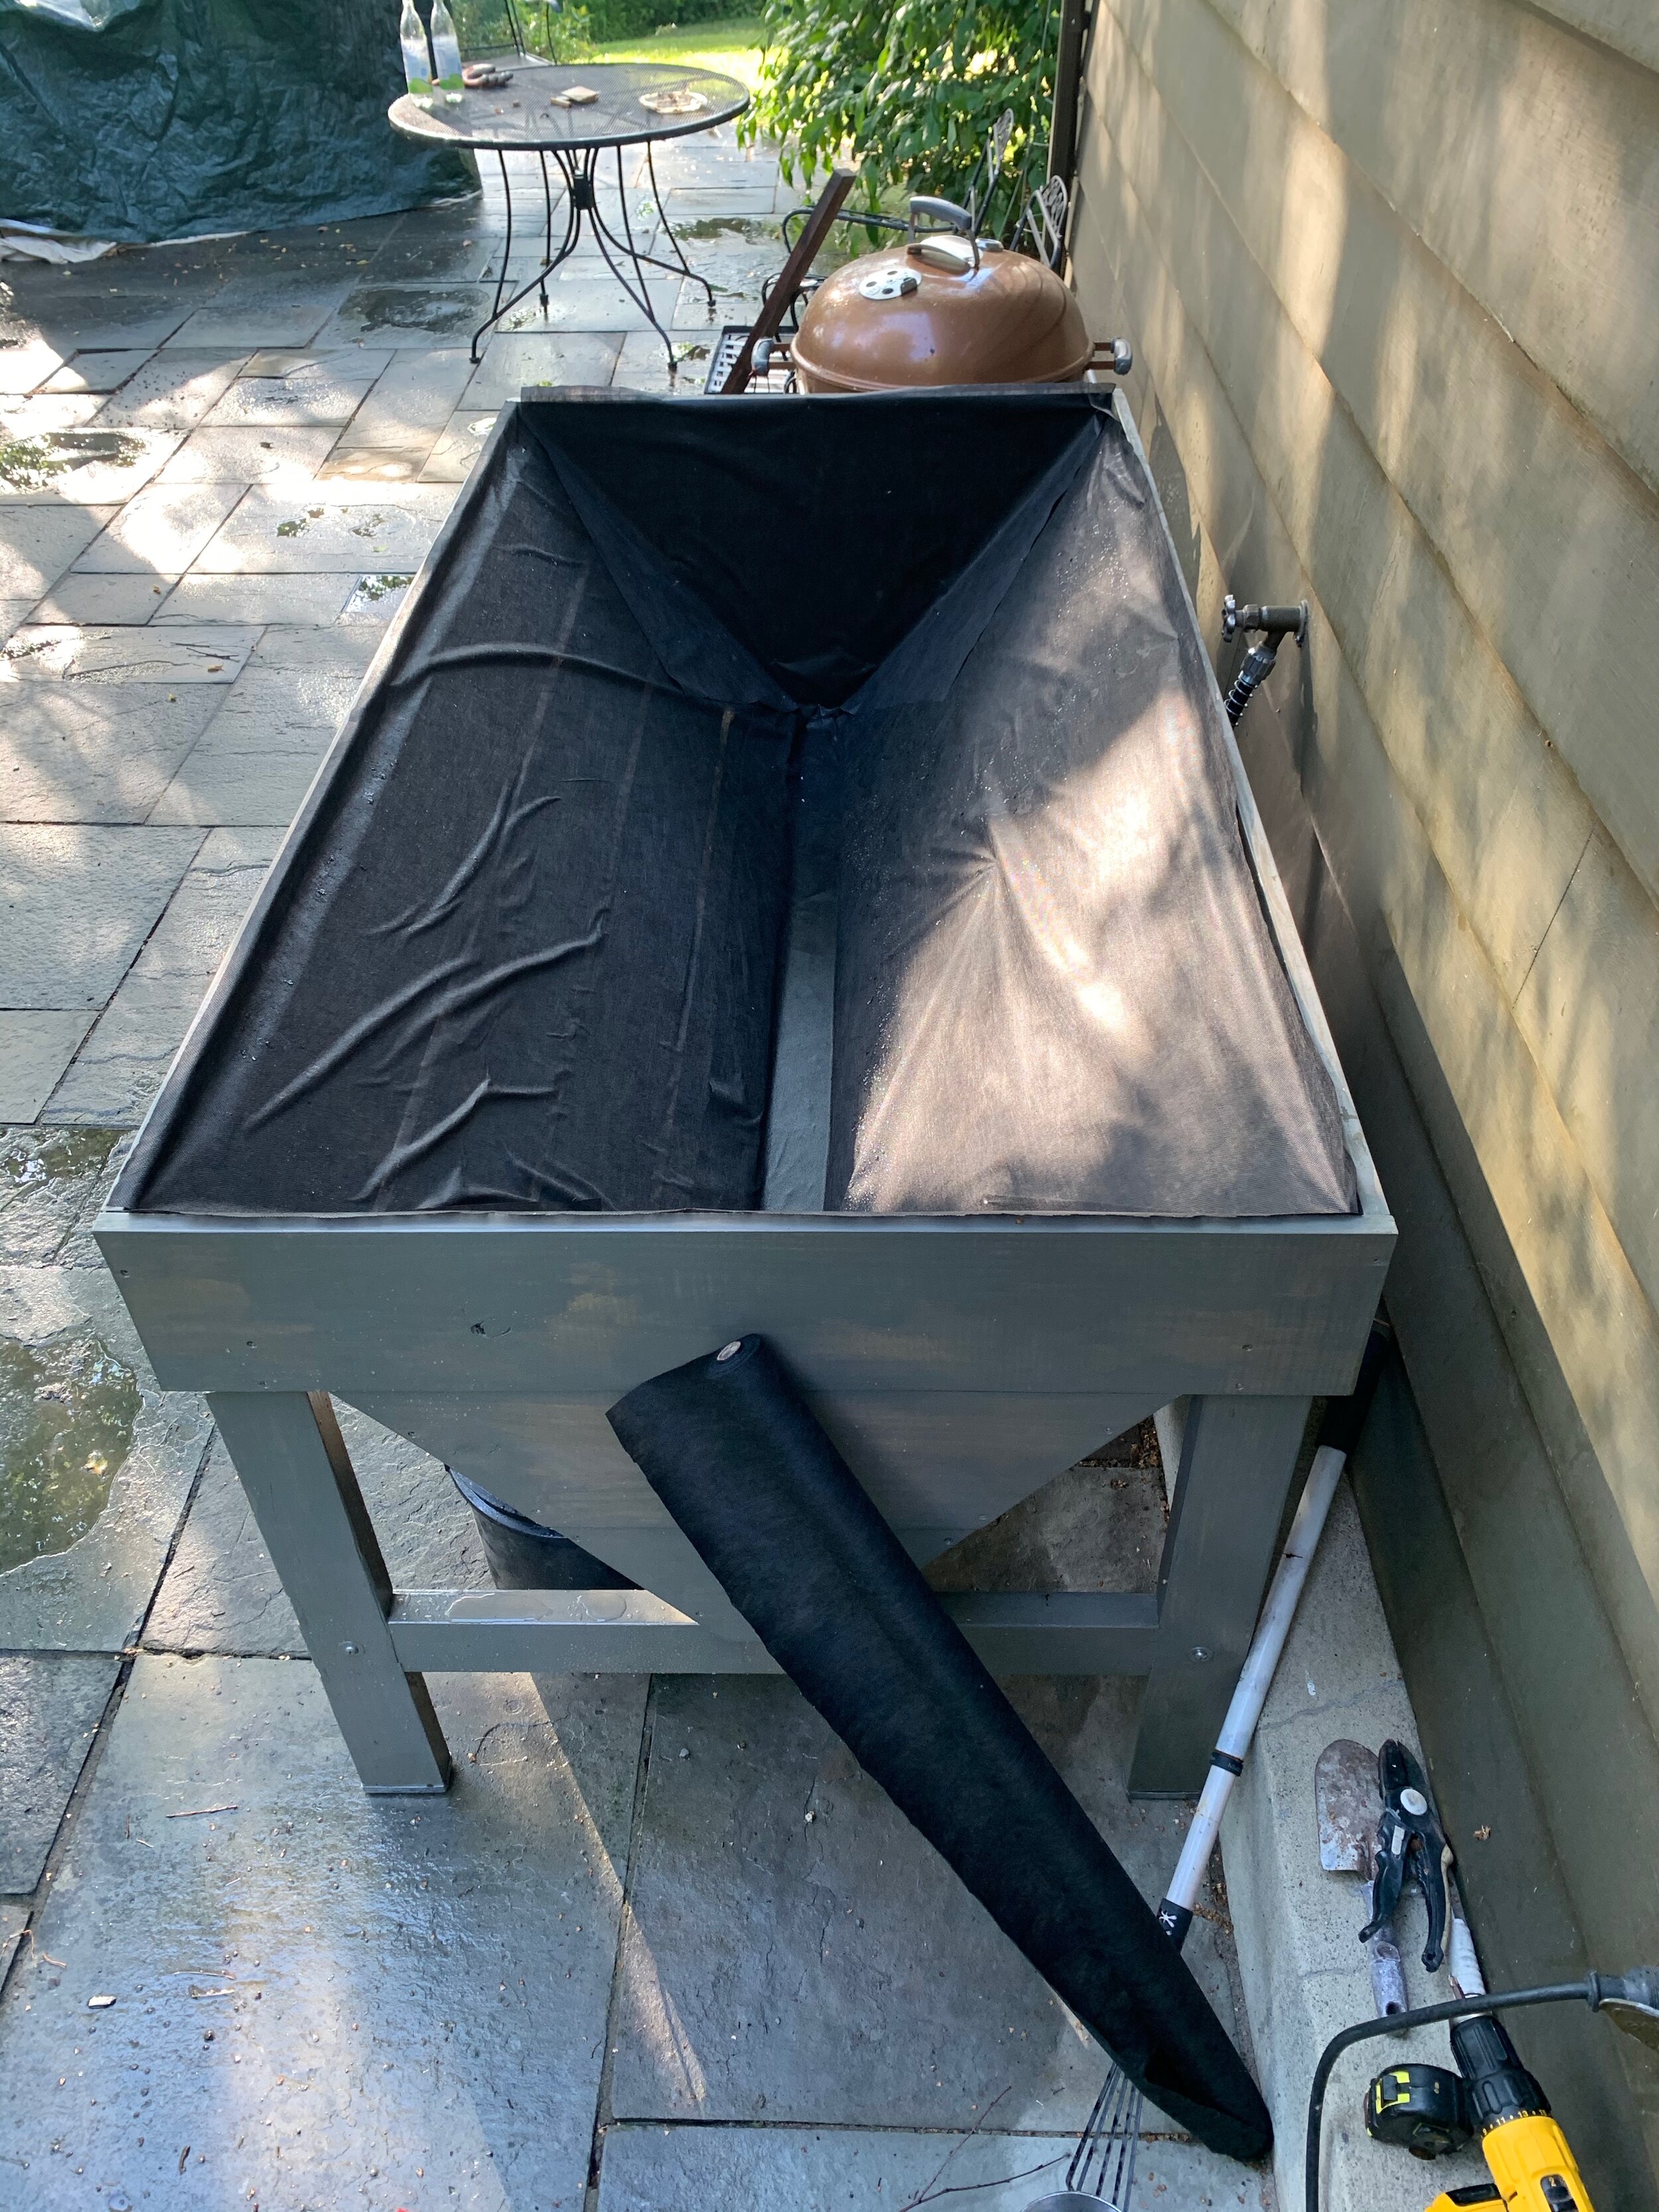
The inside of the trugs are lined with a weed barrier, which I believe is intended for use under patios and sidewalks, but worked just fine for keeping the roots of my plants from accidentally poking through, as well as for soil and water retention. It may have provided some filtration too, but the runoff was black to brown in decreasing intensity all season. All the drainage seems to meet at the center of each cross member, combining to form stable little spouts. I kept pots under the drip spots that would fill over the day after morning watering.

Once my seedlings were in the planter they took off growing at a remarkable rate! The second trug went together much faster too, as if spurred on by their success.

In the first planter, from left to right, I planted Russian red kale, cubanelle peppers, bell peppers, an Heirloom tomato, frilly kale, and dinosaur kale. In the Second I planted cherry tomatoes, jalapeno peppers, pickling cucumbers, more scattered kale, a Roma tomato and some Cayenne peppers. Some of the plants flourished in the raised planters, like the kale and the peppers, which consistently produced ever bigger fruits and leaves at a useful rate. The tomatoes took the entire season to produce only a few fruits, but I think I take the blame for planting them both late and crowded. The rightmost corner kale, although the runt of the garden, remained alive and fresh all through the winter under a drift of snow.

I enjoyed all my miniature produce from my fairly miniature garden but my thoughts remained on my first inspiration: a plant system. I had first imagined a built-in trench drain irrigation system, integrating the garden hose, and some kind of consideration of beneficial plant adjacency. I wanted to like, program a garden. As this next Spring emerges I’m busily preparing what I might try out in the next planting~